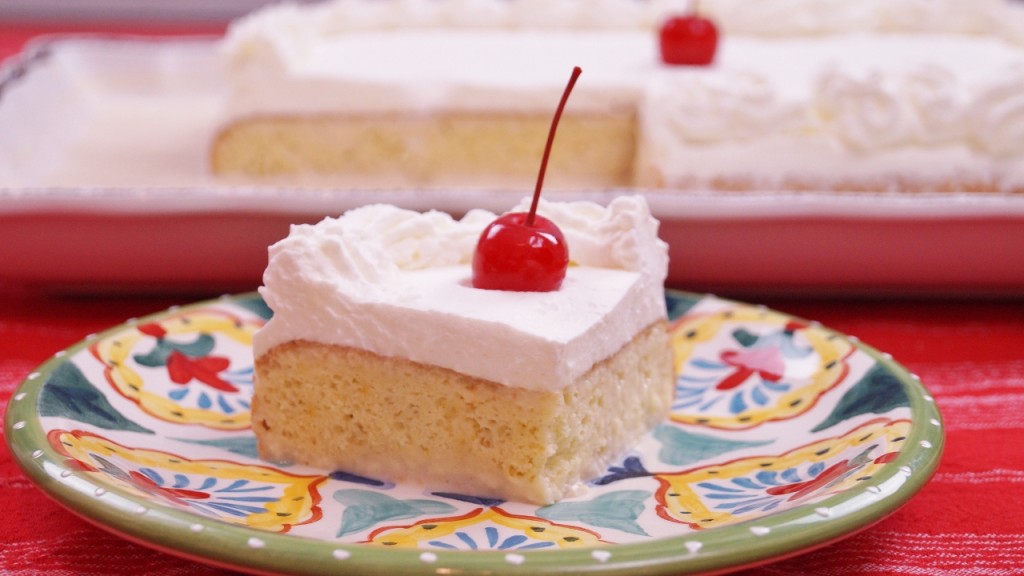
Tres Leches Cake
Tres Leches cake is simply one of the Best cake recipes! This classic Mexican dessert is a delicious and tender sponge cake soaked in 3 milks and topped with whipped cream. Mexican in origin, the name, “Tres Leches Cake”, translates to “Three Milks Cake” in Spanish. This rich, sweet, moist cake just seems to melt in your mouth. Tres Leches Cake makes an impressive finish to a Mexican dinner, Cinco de Mayo party or any special occasion. You may find it hard to stop eating it once you start. Consider yourself warned! I hope you find this Tres Leches Cake recipe easy to follow and as sinfully delicious as I do. Enjoy! Di 😉
What’s your favorite cake recipe? Mexican Recipe? Dessert recipe? Leave me a comment! Go to this Recipe on YouTube or visit my Facebook Page! Let me know if there’s something you’d like to see.
What you’re craving could be my next recipe!
Watch The Video! Learn How To Make Tres Leches Cake From Scratch! Recipe by: Diane Kometa
*SUBSCRIBE HERE*
Subscribe to Dishin’ With Di’s YouTube Channel for the latest recipes! It’s FREE!
Don’t Miss An Episode!
Tres Leches Cake Recipe

Ingredients:
- Cake
- 1 1/4 cups all-purpose four
- 1 1/4 cup sugar – divided
- 6 Eggs – separated – room temperature
- 1 ½ tsp. pure vanilla extract
- ¼ tsp. salt – plus a pinch more
- 2 tsp. baking powder
- ½ cup whole milk
- Note: Eggs are easier to separate when they are cold. If you do this, then cover the bowls of separated eggs with some plastic wrap and allow them to come to room temperature.
- Soaking Milks
- 14 ounces sweetened condensed milk
- 12 ounces evaporated milk
- 1/2 cup heavy cream
- 1 tsp pure vanilla extract
- Topping
- 2 cups heavy cream
- 4 Tbs. sugar
- Maraschino cherries (optional)
Directions:
- Preheat oven to 350 Degrees F and place the oven rack in the center position. Butter a 9×13 baking dish and set aside.
- Sift together the flour, baking powder and ¼ tsp. of salt into a bowl. Whisk to thoroughly combine. Set aside, but keep the sifter handy.
- Into a large mixing bowl the bowl, using either of a stand mixer with the paddle attachment or a hand mixer, beat the egg yolks with 3/4 cup sugar, until thick, fluffy and pale in color. When the batter is lifted with a spatula and falls back into the bowl, it should stay on the surface for a few seconds and then disappear back into the mixture. Scrape the bottom and sides of the bowl as needed.
- In a measuring cup, combine the room temperature whole milk with 1 ½ teaspoons of the vanilla extract. With the mixer on low, slowly stream the milk and vanilla mixture into the beaten egg yolks and then beat for about 1 minute to thoroughly combine. The mixture will be thinner that it was prior to adding the milk. Set aside.
- In a separate clean bowl, using a mixer with the whisk attachment, beat the egg whites with a pinch of salt until soft peaks form. Gradually add the remaining 1/2 cup of sugar and beat until the mixture forms stiff, glossy peaks.
- Grab the dry ingredients and sift ½ of the flour mixture over the beaten egg yolk mixture. Using a wire whisk or rubber spatula, fold the dry ingredients into the egg yolk mixture, just until the flour disappears. Sift in the remaining dry mixture and fold just until combined. Scrape the bottom and sides of the bowl as needed.
- To the egg yolk and flour batter, add about 1/4 of the beaten egg whites to the bater and fold in gently with wire whisk. Fold the batter from the bottom up and over itself, allowing it to fall through the whisk. Be gentle. Once that is mostly mixed through, add the remaining egg whites and use a rubber spatula to fold them into the batter, just until combined. The mixture will be light and fluffy and there should be a spot of egg white here and there. Do not over mix.
- Pour the batter into the prepared baking dish and bake for about 25-30 minutes or until a toothpick inserted into the center comes out clean. Place the baking dish on a rack to cool, while you prepare the soaking milks.
- Into a large measuring cup or medium size bowl, add the heavy cream and then whisk in the sweetened condensed milk, until thoroughly combined. Whisk in the evaporated milk, along with 1 teaspoon of vanilla extract. Note: The sweetened condensed should not be added first, as it is very thick and heavy and will settle to the bottom of the bowl and be more difficult to mix through.
- Run a knife around the edges of the baking dish to release the cake. Wearing oven mitts, invert the cake onto a large platter with high sides. Note: the cake can be left in the baking dish if desired. Using a fork, gently poke holes about a ½ inch apart all over the top of the cake. Be sure the fork goes all the way through. Slowly pour or ladle some of the milk mixture over the top of the cake evenly. Allow the milk to absorb and then add a little more. Be sure to soak the edges of the cake and not just the center. Use a spoon or ladle to spread the milk our evenly over the cake. Continue to do this until all of the milk mixture has been added. There may be a pool of milk around the bottom of the cake. Most or all of this will absorb eventually.
- The cake must now be refrigerated for a least 1 hour, but preferably overnight. Place several toothpicks into the cake at each corner, in the center and along the sides to tent plastic wrap over the cake, so it doesn’t stick to the cake or the liquid. Cover with plastic and chill. Note: The cake cannot be left at room temperature for a long period, because the milk will spoil. Refrigerate promptly.
- Once the cake is chilled, remove the wrap and toothpicks and make the topping: Chill the whisk and bowl of a mixer in the freezer for about 15 minutes. Pour the cold heavy cream into the bowl and then turn the mixer on low and gradually add the sugar. Beat to firm glossy peaks. When the whisk is lifted from the bowl and the peak stays up, stop mixing. Do not over mix, as the cream will begin to clump together and will turn into butter.
- Spread about 2/3 of the whipped cream over the top of the cake reserving the rest to pipe swirls around the edge. If you do not want to pipe the cream, just put it all on the cake. You can make small peaks with the spatula or just leave the top smooth. You can also spread the whipped cream onto the sides of the cake.
- Place the remaining whipped cream into a piping bag (or a disposable plastic bag with the corner cut off) fitted with a large star tip. Pipe swirls or your desired design around the edges or over the top of the cake.
- Rinse some maraschino cherries under some cold water and pat dry with paper towels. Top the cake with a maraschino cherry in the center or as many as you’d like. I prefer just one in the center and then I place a cherry on each piece of cake as it’s sliced. Note: Leftover cake must be refrigerated and keeps for about 2-3 days. Enjoy! Recipe by: Diane Kometa
Tagged: 3 milks, 3 milks cake, angel food, authentic, baked, baking powder, basic tres leches cake, best, Cake, cherries, Cinco de Mayo, Classic, cream, decorating, decorations, delicious, demonstration, Dessert, dessert ideas, Desserts, Diane Kometa, Dishin With Di, dulce de leche, Easter, easy, egg whites, egg yolks, eggs, evaporated milk, filling, flour, from scratch, Frosting, granulated sugar, heavy cream, homemade, How To Make, Icing, Latin, Maraschino cherries, Mexican, Mexican dessert, milk, milk cake, moist, Old Fashioned, origin, pastel de tres leches, perfect, piping, rich, salt, Spanish, sponge, sugar, sweetened condensed milk, tender, three milks cake, topping, torta de tres leches, Traditional, tres leches cake, ultimate moist cake, whipped cream, whipped cream frosting, white sugar, whole milk
